From Tears to Ticks: Our 7-Day Guide to Teach Kids to Tell Time with an Analog Clock
The big hand, the little hand, the numbers that mean two different things… I remember the frustration vividly. My son, Leo, would stare at the analog clock on the wall, his brow furrowed in confusion, and the attempts to teach kids to tell time would often end in sighs and sometimes even tears. We tried worksheets, flashcards, and picture books, but nothing seemed to click. The abstract concept of time just wasn't translating into something he could grasp. How can you make learning to tell time a joyful adventure instead of a daily battle? That was the question that led me down a late-night search, and thankfully, to a simple, colorful, and incredibly effective solution.

I discovered a fantastic online learning tool that transformed our entire approach. It wasn't just a static image; it was a vibrant, interactive playground for time. This guide is my story—a real-life, 7-day journey of how we went from frustration to fascination, and how you can, too.
Understanding the Frustration: Why Kids Struggle with Telling Time
Before we dive into the solution, it’s important to acknowledge the challenge. If you're facing telling time struggles, you are not alone. For a child, an analog clock is a complex device. They have to learn that there are two hands moving at different speeds, that the numbers 1 through 12 represent both hours and minutes, and that they need to count by fives. It's a lot to process!
Common Hurdles: Deciphering the Hour and Minute Hands
The most common hurdle we faced was Leo mixing up the hour and minute hands. He’d correctly identify the short blue hour hand but then get stuck on what the long red minute hand meant. Was it pointing to the 3, or was it pointing to 15? This confusion is a huge roadblock for many kids. Traditional teaching methods often fail to provide the immediate, hands-on feedback needed to connect these concepts.
The Parent's Dilemma: Finding Effective & Engaging Teaching Methods
As a parent, my dilemma was finding something that could hold his attention. Worksheets felt like a chore, and physical toy clocks were clunky and offered limited interaction. I needed a tool that was engaging enough to feel like a game but educational enough to deliver real results. The goal was to find a resource that could make the abstract concept of time tangible and fun, bridging the gap between seeing and understanding.
Our 7-Day Journey: Using the Interactive Analog Clock – A Parent's Guide
This is where our journey truly began. We committed to a week of "clock play," using the interactive features of our teaching tool every day. Here’s a breakdown of our simple but transformative 7-day plan, a parent time teaching guide that you can easily follow.
Day 1-2: Laying the Foundations with Our Interactive Clock
Our first two days were all about exploration. We opened the interactive analog clock on our tablet and I let Leo take the lead. The first thing he loved was that he could physically drag the hands around the clock face. We focused on the basics:
- The Hour Hand: We started by moving only the blue hour hand. We’d point it directly at a number and say, "It's 1 o'clock! Now it's 2 o'clock!" The digital display at the top instantly confirmed what we were doing, providing that crucial immediate feedback.
- The Minute Hand: Next, we focused on the red minute hand, explaining that when it points straight up to the 12, it's "o'clock." We spent time just setting different "o'clock" times—3 o'clock, 7 o'clock, 10 o'clock—until he was confident.
Day 3-4: Turning Practice into Play with Random Times & Hidden Digits
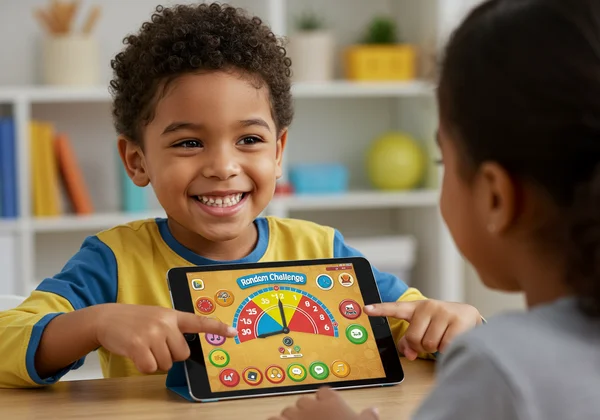
By day three, Leo was ready for a challenge. This is where the gamified features of the tool became our best friend, turning our sessions into fun clock learning.
-
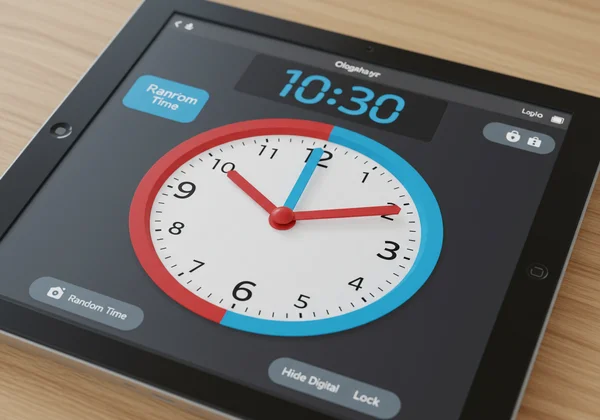
Random Time Challenge: We hit the "Random Time" button. The clock would spin and land on a new time. It became a fun quiz game. At first, I’d help him figure it out. "Look! The short hand is just past the 4, and the long hand is on the 6. That's 4:30!"
-
Hide and Seek: The real magic happened when we used the "Hide Digital Time" button. I would set a time, and he would have to guess what it was. Then, with a triumphant tap on "Show Digital Time," he could see if he was right. This feature alone boosted his confidence immensely, as it allowed him to test himself without any pressure. You can try the clock and see this feature in action.
Day 5-6: Focused Learning – Mastering Quarters and Half Hours
With the basics down, we moved on to trickier concepts like "half past," "quarter past," and "quarter to." The website’s features were perfect for this.
- Locking the Hour Hand: We used the "Lock" feature to keep the hour hand pointed between two numbers, for example, between the 2 and 3. Then, we moved only the minute hand to the 6 to show "half past 2" (2:30). This isolated the concept of the minute hand’s position, making it much easier to understand.
- Counting by Fives: We practiced moving the minute hand from one number to the next, counting aloud: "5, 10, 15, 20..." Seeing the digital numbers change with each movement of the hand on the adjustable clock made the connection between the clock face and the 60-minute cycle crystal clear.
Day 7: Celebrating Success & Embracing Fun Clock Learning
On our final day, we put all the pieces together. We played round after round of the "Random Time" game with the digital display hidden. Leo was getting most of them right, and more importantly, he was having a blast. He was no longer intimidated by the analog clock; he saw it as a puzzle he could solve. We celebrated his new skill with his favorite ice cream. It wasn't just about learning to tell time; it was about overcoming a challenge together and discovering that learning can be exciting.
Beyond the Screen: Simple Tips to Reinforce Time-Telling Skills
Even with our amazing online tool, we found that reinforcing Leo's skills in the real world was essential. Here are some simple ways we helped solidify his understanding.
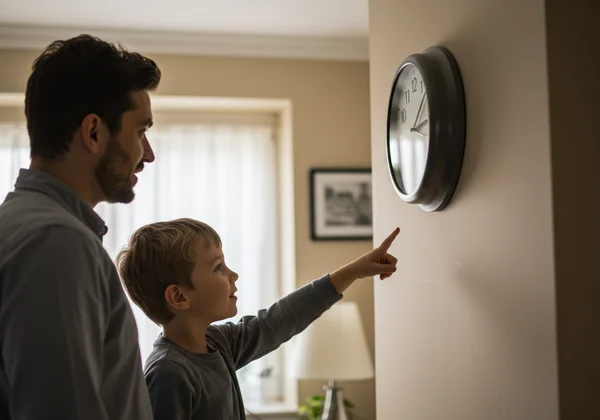
Incorporating Analog Clocks into Everyday Life
Start pointing out analog clocks wherever you go—at the library, in a friend's house, or at the train station. Connect time to your daily routine. Say things like, "It's 5 o'clock! Time to start making dinner," or "Your bedtime is at 8 o'clock. Can you show me what that looks like on your practice clock?" This makes time a relevant and practical part of their day.
Fostering Patience and Persistence in Your Young Learner
Remember, every child learns at their own pace. There will be days when they mix up the hands or forget how to count by fives. The most important thing is to stay patient, positive, and encouraging. Celebrate small victories and focus on progress, not perfection. Keep the learning light and fun, and your child will get there. Using a fun timetelling game can help keep spirits high.
Your Child's Time-Telling Adventure Awaits: From Tears to Triumphs!
Our seven-day journey completely changed how my son sees time. What started as a source of frustration has become a skill he is proud of. By trading boring worksheets for an engaging, hands-on tool, we transformed a difficult lesson into a week of fun and connection. The key was having an interactive resource that provided immediate feedback and allowed him to learn by doing.
If you’re struggling to teach your child to read a clock, I wholeheartedly encourage you to give this method a try. You have nothing to lose and a world of confidence and understanding to gain. Start your own time-telling adventure today! Visit the interactive clock and see how a little bit of fun can make all the difference.
Frequently Asked Questions About Teaching Kids to Tell Time
What age should a child be able to read an analog clock?
While every child develops differently, most children are ready to start learning the basics of an analog clock between the ages of 5 and 7. Typically, they start with telling time to the hour and half-hour in kindergarten or first grade and master more complex time-telling (to the minute) by second or third grade. The key is to introduce it when they show interest and have a basic understanding of numbers.
How do you explain the hour and minute hand to a child effectively?
Keep it simple and visual! I found success by giving the hands distinct characteristics. We called the short blue hand the "little hour hand" and explained its job is to point to the "big number" for the hour. The long red hand was the "big minute hand," and its job was to race around the clock. Using color and size as differentiators, like on our interactive clock tool, makes it much easier for them to remember.
Are interactive analog clocks better for learning than traditional methods?
In my personal experience, absolutely. While traditional methods have their place, an interactive analog clock offers a dynamic, hands-on experience that static worksheets can't match. The ability for a child to physically move the hands and see the digital time change instantly creates a powerful cause-and-effect learning loop. Features like hiding the digital time for self-quizzing and locking one hand to focus on the other are invaluable for targeted practice. A great free teaching clock makes learning feel like play, which is the most effective way for kids to learn.