Free Teaching Clock Worksheets & Classroom Activities for Telling Time
Ever feel like teaching kids to tell time is a race against the clock? You're not alone. Transforming those abstract hands and numbers into something tangible and exciting for young learners is a constant challenge. The key? Finding engaging, practical resources that really make learning stick. What if we could turn learning time into an adventure, not a chore? This guide is your new secret weapon, packed with free telling time worksheets and dynamic classroom activities.
Welcome to your go-to toolkit for time-telling success. Here, you'll discover lesson planning guides, creative activities, and downloadable resources to empower your students. We'll show you how to blend traditional practice with modern technology, creating a learning environment where every child can thrive. Get ready to transform your time lessons with these fun and effective strategies, starting with a powerful online teaching clock.
Crafting Your Time Lesson Plan: A Step-by-Step Guide
A great lesson plan is the foundation of effective teaching. When it comes to telling time, breaking down the concepts into manageable steps is crucial for building student confidence. A structured approach prevents overwhelm and ensures that every child masters the fundamentals before moving on to more complex ideas. These teaching time resources are designed to help you build a curriculum that is both logical and engaging.
Think of teaching time as building a house. You need to lay a solid foundation by explaining the parts of the clock before you can put the walls up with concepts like "quarter past" and "half past." This section provides a clear roadmap, guiding you from the very basics to more advanced time-telling skills, ensuring your students have the tools they need to succeed.
Starting with the Basics: Hour and Minute Hands Explained
The first step in any time-telling lesson is a clear introduction to the clock's main characters: the hour hand and the minute hand. Many children get confused because the hands look similar and are constantly moving. Explaining clock hands effectively is about creating simple, memorable associations.
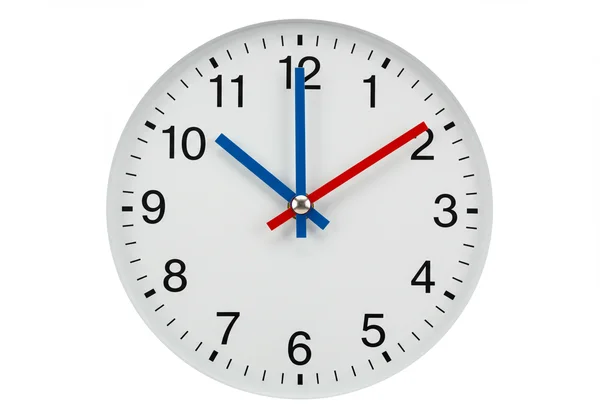
A fantastic way to do this is to give them distinct identities. You can explain, "The short, blue hand is the hour hand. It moves slowly because hours are long. The long, red hand is the minute hand. It's the faster one because minutes go by quickly!" This visual and narrative connection helps cement their roles. Using an interactive analog clock where you can move each hand independently is an invaluable tool for this stage. You can isolate the blue hour hand to show how it points directly to the hour, then focus on the red minute hand to count by fives.
Progressive Learning: From O'Clock to Quarter Past & Beyond
Once students can confidently identify the hour and minute hands, you can begin your learning time step-by-step journey. Start with the simplest concept: telling time to the hour ("o'clock"). Have students practice setting the clock to 1 o'clock, 5 o'clock, and 9 o'clock, focusing on how the minute hand always points to the 12.
From there, you can introduce "half past," explaining that the minute hand has traveled halfway around the clock to the 6. Next, tackle "quarter past" (the 3) and "quarter to" (the 9). Use visual aids and repetition to reinforce these key positions. Finally, you can move on to counting minutes in five-minute increments, which is where the real magic happens. This gradual progression builds a strong scaffold of understanding, preventing frustration and promoting mastery.
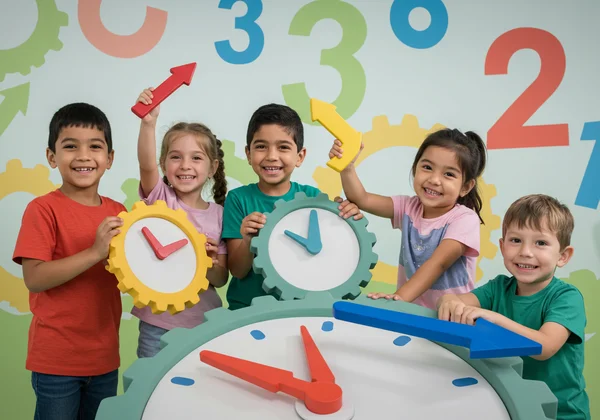
Engaging Classroom Clock Activities That Stick
Worksheets have their place, but true understanding comes from active participation and play. Dynamic classroom clock activities transform passive learners into active problem-solvers. When children are moving, collaborating, and competing in friendly challenges, the lessons become memorable experiences rather than just facts on a page. The goal is to make the clock less of an abstract diagram and more of an interactive game.
These activities are designed to get your whole class involved, whether you're using a smartboard, tablets, or just physical space in your classroom. From whole-group demonstrations to partner puzzles, these ideas will infuse your lessons with energy and help solidify time-telling concepts in a fun, hands-on way.
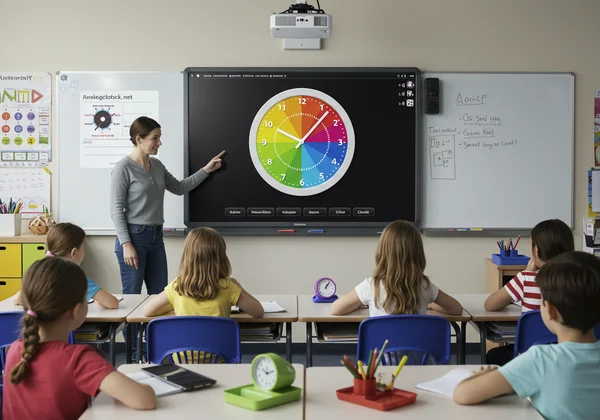
Bring Lessons to Life with Our Interactive Clock on Your Smartboard
Your interactive whiteboard or classroom projector is the perfect stage for a giant, engaging clock. By projecting the AnalogClock.net homepage, you create a powerful visual anchor for your lessons. This interactive smartboard clock is far more effective than a static image because you can manipulate it in real-time.
Start a lesson by asking students to call out a time and then drag the hands to match. Use the "Random Time" feature to generate a pop quiz, challenging the class to shout out the answer. For a powerful self-assessment tool, use the "Hide Digital Time" button. Ask a student to come to the board, read the analog clock, and then click "Show Digital Time" to see if they were right. This immediate feedback is incredibly motivating and turns practice into an exciting game.
Group Challenges & Partner Puzzles: Collaborative Time Fun
Encourage teamwork with collaborative time games. One popular activity is "Time Match-Up." Prepare a set of cards with digital times (e.g., 3:45) and another set with written times (e.g., "quarter to four"). In pairs, students must work together to match them correctly.
Another fun game is "Human Clock." Draw a large clock face on the playground with chalk or use hoops in the classroom. Call out a time, and two students have to work together, using their bodies to become the hour and minute hands. These hands-on, team-based activities don't just reinforce learning; they also sharpen communication and teamwork skills. They're a fantastic way to ensure every student actively participates and truly grasps the concepts.
Your Go-To Source for Printable Telling Time Worksheets
While interactive learning is key, targeted practice is essential for reinforcement. High-quality printable telling time worksheets provide the structured repetition needed to build fluency and confidence. They are perfect for independent work, morning warm-ups, or homework assignments, allowing you to assess individual student understanding.
We’ve designed a series of worksheets that move beyond simple drills. These resources are crafted to develop multiple skills simultaneously, from fine motor control to logical reasoning. They serve as the perfect offline complement to the dynamic practice your students get with the online practice clock.
"Draw the Hands" Worksheets: Developing Fine Motor & Time Skills
One of the most effective ways for children to demonstrate their understanding is through draw the hands practice. These worksheets present a blank clock face with a digital time written below. The student's task is to accurately draw the short hour hand and the long minute hand in their correct positions.
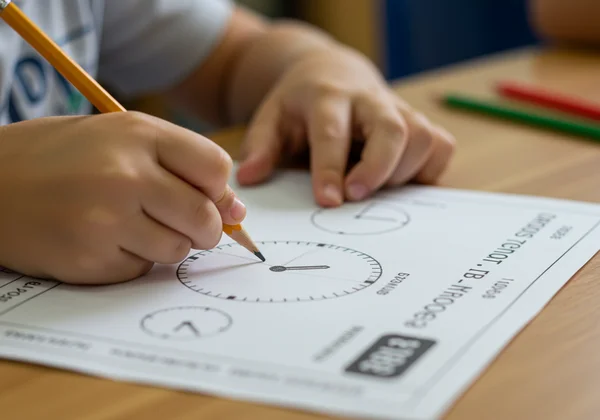
This activity does more than just test their time-telling knowledge. It also enhances their fine motor skills and attention to detail. They must remember that the hour hand should be shorter and that if the time is 3:30, the hour hand shouldn't point directly at the 3, but halfway between the 3 and the 4. This reinforces the subtle but critical concept that the hour hand moves continuously.
Match Digital to Analog: Reinforcing Time Equivalencies
Connecting the two ways of seeing time is a crucial cognitive leap for children. Our matching time worksheets are designed to bridge this gap. On one side of the page, students will see a column of analog clocks displaying various times. On the other side is a jumbled column of their corresponding digital times.
The task is to draw a line connecting each analog clock to its correct digital partner. This exercise directly reinforces the relationship between the position of the hands and the numbers on a digital display. It's a fantastic assessment tool that quickly reveals which students understand the equivalencies and who might need more hands-on practice with an adjustable clock tool.
Free Download: Customizable Clock Faces for Hands-On Practice
Every classroom needs versatile, hands-on tools. That's why providing printable clock faces is a game-changer. These blank clock templates can be used in countless ways. You can laminate them for use with dry-erase markers, allowing for endless practice without wasting paper.
Students can use them to follow along during a lesson, setting their own clocks to the times you call out. You can also add clock hands with a simple brass fastener to create individual, movable practice clocks. These customizable faces are the ultimate hands-on resource, allowing students to physically manipulate time and build a deeper, kinesthetic understanding of how a clock works.
Empower Your Classroom with This Ultimate Time Teaching Toolkit
You now have a complete toolkit to make teaching time effective, engaging, and fun. By combining a structured lesson plan with dynamic classroom activities and reinforcing concepts with targeted worksheets, you create a rich and varied learning experience. You are empowering your students not just to read a clock, but to truly understand the concept of time.
The key is to blend these hands-on and written resources with a powerful digital tool. The interactive nature of an online clock brings the lesson to life in a way that static materials cannot. Are you ready to make your next time-telling lesson the best one yet? Explore the fun clock playground and see the excitement for yourself!
Common Questions for Teaching Time
Why are analog clocks still taught in school?
Even in a digital world, learning to read an analog clock is a vital skill. It teaches children about fractions, counting by fives, and the cyclical nature of time. Unlike a digital display, an analog clock provides a visual representation of time's passage, helping students understand concepts like "in 15 minutes" or "half an hour ago" more intuitively.
What age should a child be able to read an analog clock?
Most children begin learning to tell time between the ages of 5 and 7. Typically, they start by learning to read the hour (o'clock) in kindergarten or first grade. They then progress to half-hours, quarter-hours, and finally telling time to the nearest minute by second or third grade. However, every child learns at their own pace, and consistent, fun practice is the most important factor.
How do you explain the hour and minute hand to a child?
The best way is to use simple, clear language and visual cues. Explain that the clock has two important hands. The "short hand is the hour hand" because "hour" is a short word. The "long hand is the minute hand" because "minute" is a longer word. Using the color-coded blue hour hand and red minute hand on our interactive analog clock tool provides an excellent visual reinforcement for this concept.
Are analog clocks better for learning than digital?
For learning the concept of time, yes. Analog clocks help children visualize the flow of time and understand the relationship between minutes and hours. They provide a spatial context that digital clocks lack. While digital clocks are convenient for reading the time quickly, analog clocks are superior tools for building a foundational understanding of how time works.