At-Home Analog Clock Workshop: Teach Time with Our Interactive Clock
Watching your child struggle to understand the big and little hands on a clock can be frustrating. You've tried worksheets and traditional teaching clocks, but the concept just isn't clicking, and their attention fades. Feeling overwhelmed teaching this essential skill? This guide is for you. We're going to transform this tricky subject into a fun, step-by-step workshop using a powerful analog clock. How do you read an analog clock step by step? We'll break it down into an engaging learning adventure for you and your child, showing you how our interactive tool can be your best teaching assistant.
Setting Up Your Home Education Clock Workshop
Before diving into hours and minutes, a little preparation can make all the difference. Creating a positive and structured learning environment is the first step to success. This isn't about rigid lessons; it's about setting the stage for playful discovery with a home education clock that your child will love.
What You'll Need: More Than Just a Screen
Your main tool is, of course, the free online analog clock. But you can enhance the experience with a few simple items:
- A tablet, laptop, or computer with internet access.
- A comfortable, quiet space free from distractions.
- Optional: Paper and crayons for your child to draw the times you create together.
- A positive attitude! Your enthusiasm is contagious.
Choosing Your Learning Spot & Time
Find a cozy corner where you and your child can sit together comfortably. Avoid times when they are tired or hungry, like right before bed or a meal. A short, 10-15 minute session after breakfast or as a quiet afternoon activity is perfect. Consistency is more important than length; a little practice each day builds momentum and keeps the learning fun.
Setting Smart Goals for Teaching Time
Don't try to teach everything at once. Start with a simple goal, like mastering telling time to the hour. Celebrate small victories enthusiastically! As your child gains confidence, you can gradually introduce more complex concepts. The goal is progress, not perfection, and our adjustable clock is designed to grow with your child's skills.
Mastering Basic Time: Interactive Clock Activities for Beginners
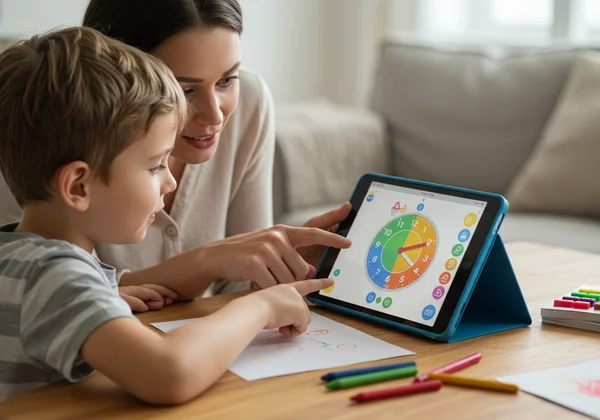
Now for the fun part! It's time to introduce the clock itself. The key is to make it feel like a game, not a test. With our vibrant and hands-on tool, these foundational interactive clock activities will captivate your child's attention and make abstract concepts concrete.
Understanding the Blue Hour Hand & Red Minute Hand
Open up our interactive clock tool. The first thing your child will notice is the colorful clock face. Point out the two hands. Explain it in simple terms:
-
The Short Blue Hand is the Hour Hand: It moves slowly and points to the big numbers (1 through 12) to tell us the hour.
-
The Long Red Hand is the Minute Hand: It moves faster and tells us how many minutes have passed in the hour.
Let your child take control! Encourage them to click and drag the hands. They'll see the digital time change instantly above the clock, providing immediate feedback that connects their actions to the result.
First Steps: Whole Hours and Half Hours Practice
Start with the basics. Set the long red minute hand to the 12. Explain that whenever the red hand is pointing straight up at the 12, it's a new hour, or "o'clock." Move the short blue hour hand to different numbers—3, 6, 9—and say the time out loud together: "Three o'clock!"
Once they're comfortable with hours, move the red minute hand to the 6. Explain that when the minute hand points straight down, it means "half past" the hour. Practice setting times like "half past two" or "half past ten." This builds a solid foundation for reading clocks for kids.
Using Our Interactive Clock's Core Features for Basics
Our tool is more than just a picture of a clock; it's a dynamic learning playground. As your child drags the red minute hand around, they'll see the blue hour hand move slowly between numbers. This visual connection is crucial for understanding how time flows. It’s an educational clock that actively demonstrates the relationship between minutes and hours, a concept static images can't convey.
Deepening Understanding: Advanced Time Reading with Our Interactive Clock
With the basics of hours and half-hours mastered, your child is ready for the next level. This is where many kids get stuck, but with the right tool, you can make advanced time reading feel like solving a fun puzzle. Let’s explore the minutes in between.
Tackling Quarter Hours (Past and To)
Introduce the concepts of "quarter past" and "quarter to." Use the clock to show them:
- Quarter Past: When the red minute hand is on the 3, it's 15 minutes or a "quarter past" the hour. Practice setting 4:15, 7:15, etc.
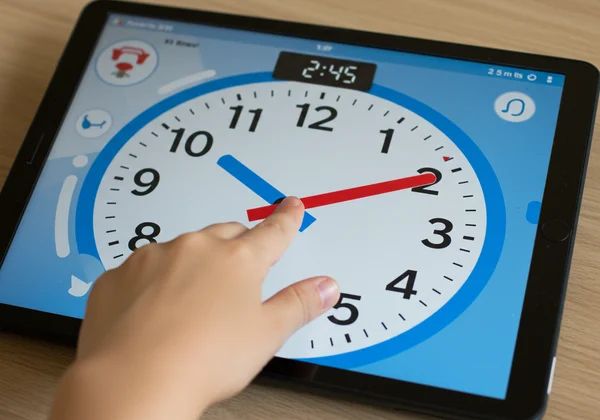
- Quarter To: When the red minute hand is on the 9, it's "quarter to" the next hour. This is a trickier concept, so use the clock to show how 2:45 is also "quarter to three."
Exploring "Minutes Past" the Hour
Now, focus on the right side of the clock. Explain that from the 12 to the 6, we talk about "minutes past" the hour. Use the interactive clock to count by fives as you move the red hand to each number (1 is 5 past, 2 is 10 past, and so on). The instant digital display reinforces their counting and helps them self-correct.
Unlocking "Minutes To" the Hour with Ease
The left side of the clock can be the most challenging. Explain that from the 6 to the 12, we can count how many "minutes to" the next hour. Move the hand to the 8 (which is 40 minutes past). Show them on the clock that this is also 20 minutes before the next hour, or "20 to." This dual perspective is much easier to grasp when they can see and manipulate the hands themselves.
Making Learning Fun: Engaging Time Games & Practice Modes
The best way to solidify learning is through practice, and the best practice feels like play. Our website is a true "Fun Clock Playground," designed with features that turn drills into exciting telling time games. This is how you build true mastery and confidence.
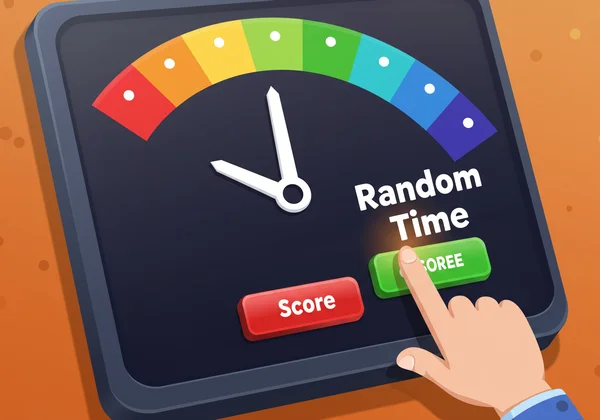
Challenge Mode: "Random Time" for Quick Quizzes
Ready for a pop quiz? Click the "Random Time" button. The clock will instantly jump to a new time. Challenge your child to read it! This is perfect for quick, fun drills. It keeps them on their toes and helps you assess their progress without the pressure of a formal test. You can make it a game: "Let's see who can get five right first!"
Self-Testing Mastery: "Hide Digital Time" for Confidence
Once your child feels more confident, use the "Hide Digital Time" feature. This is the ultimate test of their knowledge. Let them set a time or hit the "Random Time" button, then ask them to read the clock. When they give their answer, they can click "Show Digital Time" to see if they were right. This empowers them to check their own work and builds independence.
Targeted Skills: "Locking Hands" for Focused Drills
Is your child mixing up the hour and minute hands? Use the "Lock" feature for focused classroom clock practice right at home. You can lock the blue hour hand in place to focus solely on reading the minutes, or lock the red minute hand on the 12 to drill identifying the hour. This targeted practice helps isolate and overcome specific hurdles. Try these fun games to see how effective they can be.
Your Child's Journey to Analog Time Mastery Begins Here!
Teaching your child to tell time doesn't have to be a battle of wills. By transforming lessons into a playful workshop, you can turn frustration into fascination. You’ve learned how to set the stage for success, break down concepts into manageable steps, and use powerful interactive features to make learning stick. You are now equipped to be your child's favorite teacher.
The journey from "What time is it?" to confidently reading any clock face is an empowering one. Are you ready to turn screen time into a valuable learning experience? Start your adventure on our homepage and watch your child become a time-telling master.
Fragen & Antworten rund um die Uhr
What age should a child be able to read an analog clock?
While every child learns at their own pace, most children begin learning around age 6 or 7, in first or second grade. The key is to introduce it when they have a basic grasp of numbers. Our tool is perfect for learners of all ages, from curious preschoolers to older kids needing a refresher.
How do you explain the hour and minute hand to a child?
Keep it simple and visual! Use our clock's colors: "The short blue hand tells the hour, and the long red hand tells the minutes." A great analogy is a family race: the little brother (hour hand) moves slowly, while the big sister (minute hand) runs around much faster.
Are analog clocks better for learning time than digital?
Yes, for learning the concept of time, analog clocks are superior. They provide a visual representation of time's passage, duration, and the relationship between hours and minutes. This helps children develop a stronger, more intuitive understanding of time that a digital display alone cannot offer.
How do you "set" an analog clock using our interactive tool?
It's as easy as playing a game! Simply click and drag the blue hour hand or the red minute hand with your mouse or finger to any position you want. The clock is fully interactive, allowing you and your child to set any time you can imagine. Check it out here and see for yourself.